Categories
DIY Projects

How to Install Kitchen Cabinet Handles on Drawers, Doors, and Different Cabinet Types

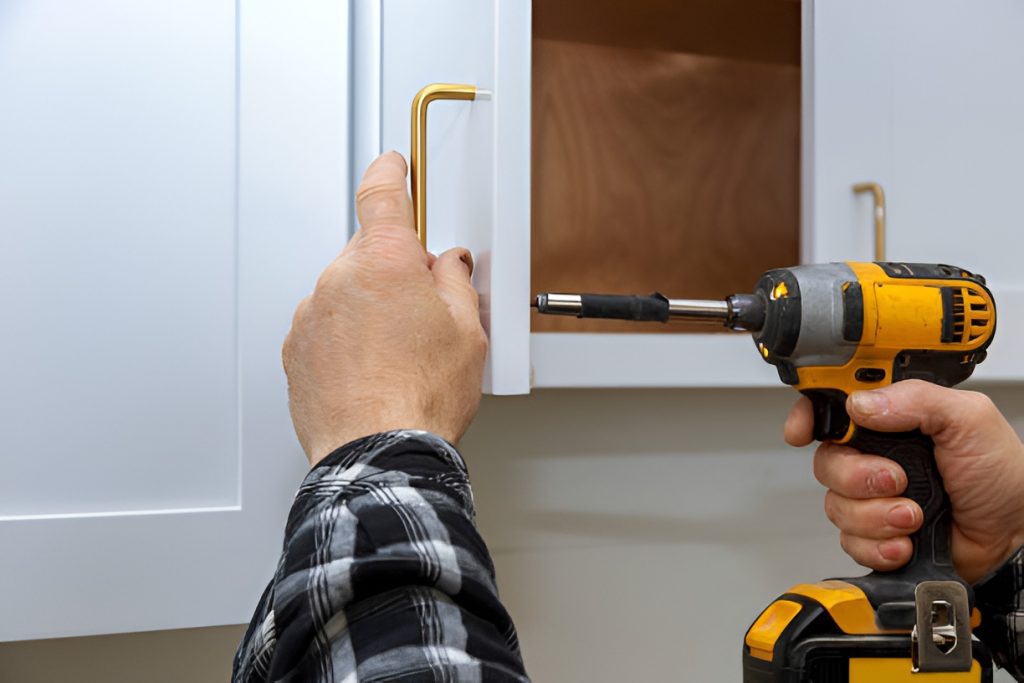
  • Accurate measurements and consistent placement are key to professional-looking handles on drawers, doors, and all cabinet types.

  • Drawers: center handles horizontally and vertically; adjust slightly above center for tall drawers if desired.

  • Doors: upper cabinet handles go near the bottom corner, lower cabinet handles near the top corner for ergonomic reach.

  • Cabinet styles matter: Shaker, slab, inset, and overlay cabinets each have placement nuances that affect alignment and aesthetics.

  • Use tools and jigs: a level, drill guide, or hardware jig ensures straight, even holes and prevents mistakes.

  • Old holes and upgrades: fill with wood filler, use backplates, or strategically reuse holes when converting knobs to handles.

  • Patience and double-checking: test-fit, step back to evaluate alignment, and avoid rushing to ensure a polished, cohesive look.

Installing cabinet handles looks simple until you’re standing in your kitchen with a drill in one hand, a tape measure in the other, and the sudden realization that one crooked hole will haunt you every time you make coffee. The good news is that once you understand the differences between drawers, doors, and cabinet styles, the process becomes straightforward and repeatable.

This guide breaks down exactly how to install kitchen cabinet handles across all the common scenarios you’ll run into, whether you’re upgrading old cabinets or finishing a brand-new kitchen. We’ll cover tools, measurements, placement rules, and cabinet-specific tips so you can work confidently and avoid rookie mistakes.

Tools and Materials You’ll Need Before You Start

Before drilling anything, get your setup right. A clean workspace and the right tools make a massive difference in how accurate and stress-free this project is.

You’ll want:

  • Cabinet handles and included screws

  • Tape measure or ruler

  • Pencil or painter’s tape for marking

  • Drill with appropriate drill bit (usually 3/16″)

  • Level or straight edge

  • Cabinet hardware jig (optional but highly recommended)

  • Masking tape or painter’s tape

  • Scrap wood for backing support

Having everything within arm’s reach prevents rushed measurements and accidental misalignment.

Why Placement Matters More Than the Hardware Itself

close-up of a man drilling a hole for a new kitchen drawer handle

Most cabinet handles look fine in isolation. What separates a professional-looking kitchen from a DIY-looking one is consistency.

Correct placement:

  • Keeps doors and drawers visually aligned

  • Makes cabinets comfortable to use

  • Prevents unnecessary stress on hinges

  • Improves resale appeal

Once you choose a placement rule, stick with it across the entire kitchen.

How to Install Kitchen Cabinet Handles on Drawers

Drawers are the easiest place to start because they’re symmetrical, predictable, and far more forgiving than cabinet doors. Installing drawer handles first also helps you build confidence before moving on to more complex cabinet types.

Because drawers don’t swing open, placement is mostly about balance and visual alignment rather than reach or clearance.

Where Should Handles Go on Drawers?

The most common and widely accepted rule is simple:

  • Center the handle horizontally on the drawer face

  • Place it vertically centered on the drawer front

This creates a clean, balanced look that works with nearly every kitchen style, from traditional to modern.

For taller drawers, especially deep pot drawers or pantry pull-outs, some homeowners prefer positioning the handle slightly above center. This can feel more ergonomic and visually pleasing in modern kitchens. If you choose this approach, apply it consistently to all drawers of the same size.

Measuring Drawer Handle Placement

Accurate measuring eliminates almost every common drawer-handle mistake. Use this process for consistent results:

  1. Measure the full width of the drawer front.

  2. Divide that measurement by two to locate the horizontal center point.

  3. Measure the height of the drawer and decide whether you want a true center or a slightly higher placement.

  4. Use the handle’s screw spacing to mark both drill holes from the center point outward.

Painter’s tape placed over the drilling area helps prevent splintering, protects the finish, and makes pencil marks easier to see and adjust.

Drilling and Installing Drawer Handles

Once your marks are confirmed:

  • Drill straight through the drawer front, keeping the drill perpendicular

  • Apply light, steady pressure to avoid tear-out

  • Insert screws from inside the drawer and thread them into the handle

  • Tighten screws evenly, alternating between them to keep the handle flush

Before fully tightening, wiggle the handle slightly to ensure it’s straight and centered.

How to Install Kitchen Cabinet Handles on Doors

Cabinet doors require more decision-making than drawers because orientation, reach, and visual flow all matter. A well-placed handle should feel natural to grab and look intentional across the entire kitchen.

Upper Cabinet Doors vs Lower Cabinet Doors

The general rule is based on how people naturally reach:

  • Upper cabinets: handles go near the bottom corner

  • Lower cabinets: handles go near the top corner

This placement reduces strain and keeps handles within comfortable reach during daily use.

Standard Placement Measurements

A widely used and visually reliable standard is:

  • Measure 2½” to 3″ from the bottom edge of upper cabinet doors

  • Measure 2½” to 3″ from the top edge of lower cabinet doors

  • Measure the same distance from the side edge for both

This creates a subtle diagonal alignment that looks intentional and professional when viewed across multiple cabinets.

Marking Door Handles Accurately

Accuracy matters more on doors than anywhere else. A cabinet hardware jig makes this step much easier, but you can still get great results without one:

  • Use a level or straight edge to keep markings aligned

  • Double-check measurements before drilling

  • Mark all cabinet doors before drilling any holes

Batching the measuring phase allows you to catch inconsistencies early and make adjustments before any permanent holes are drilled.

How to Install Kitchen Cabinet Handles on Shaker Cabinets

Shaker cabinets are one of the most popular styles, but their recessed panels introduce additional placement considerations. Where you drill can dramatically affect the finished look.

Where Handles Should Sit on Shaker Cabinets

Handles should align with the cabinet frame rather than floating in the recessed panel. The frame provides structural strength and visual consistency.

Best practice includes:

  • Positioning handles on the vertical frame stile

  • Using identical measurements across doors and drawers

  • Aligning handles with frame edges rather than panel centers

Avoid drilling into the recessed panel unless the cabinet design specifically calls for it, as this can look off-balance and weaken the panel over time.

Common Mistakes with Shaker Cabinets

The most frequent errors include:

  • Installing handles too far into the recessed panel

  • Using inconsistent spacing from the frame edges

  • Applying different placement rules across cabinet sections

Shaker cabinets highlight inconsistencies more than flat-panel designs, so precision is especially important.

How to Install Kitchen Cabinet Handles on Slab Cabinets

kitchen with shaker cabinets

Slab cabinets have flat, uninterrupted surfaces, which gives you more freedom but also removes visual cues that help guide placement.

Placement Rules for Slab Cabinet Doors

Two common placement approaches work well:

  • Centered vertically and horizontally for a clean, minimalist look

  • Edge-aligned for a more modern or industrial style

Both options are valid, but mixing them usually creates visual confusion. Choose one approach and apply it consistently across the kitchen.

Keeping Slab Cabinets Looking Clean

Because slab cabinets show every detail:

  • Use a jig or template to maintain uniformity

  • Measure twice before drilling

  • Avoid eyeballing placements, even if they look “close enough”

Even small misalignments stand out against flat surfaces with no visual breaks.

How to Install Kitchen Cabinet Handles on Inset Cabinets

Inset cabinets sit flush within the cabinet frame, creating a refined, furniture-like appearance. That same precision also makes installation less forgiving.

Special Considerations for Inset Cabinets

When working with inset cabinetry:

  • Door clearance is tighter than with overlay styles

  • Handles must not interfere with adjacent doors or drawers

  • Screws may need to be shorter than standard hardware screws

Always test-fit a handle and open the door fully before drilling all cabinets.

Best Placement Tips

To avoid issues:

  • Follow frame-alignment rules similar to Shaker cabinets

  • Keep handles far enough from edges to prevent rubbing

  • Open and close doors before final tightening

Inset cabinets reward patience and careful planning with a high-end finished look.

How to Install Kitchen Cabinet Handles on Overlay Cabinets

Overlay cabinets are the most common and forgiving style, making them ideal for DIY installations.

Full Overlay vs Partial Overlay

Understanding the difference helps with visual alignment:

  • Full overlay: doors cover most or all of the cabinet frame

  • Partial overlay: a portion of the frame remains visible

While handle placement rules remain similar, full overlay cabinets require extra attention to alignment because the frame isn’t visible to hide inconsistencies.

Maintaining Visual Consistency

To keep everything looking intentional:

  • Use identical measurements for every cabinet

  • Align handles horizontally across rows of cabinets

  • Step back frequently to evaluate the overall look

Small adjustments early in the process prevent noticeable alignment issues once all hardware is installed.

Should You Use a Cabinet Hardware Jig?

If you’re installing more than a few handles, the answer is yes.

Benefits include:

  • Faster installation

  • Consistent hole placement

  • Reduced measuring errors

  • Less mental fatigue

A jig turns a stressful project into a repeatable process.

Drill Bit Size and Screw Length Explained

Most cabinet handles use:

  • 3/16″ drill bits

  • 8-32 screws in varying lengths

Always test on scrap wood or the back of a cabinet before committing.

If screws are too long:

  • Use washers

  • Trim screws with a hacksaw

  • Buy shorter replacements

How to Avoid Crooked or Chipped Holes

Mistakes happen most often during drilling.

Prevent them by:

  • Using painter’s tape over the drill area

  • Drilling slowly and steadily

  • Backing the cabinet with scrap wood

  • Keeping the drill perfectly perpendicular

Rushing this step is the fastest way to ruin a cabinet face.

Installing Handles on Existing Cabinets with Old Holes

Upgrading from knobs to handles is one of the fastest ways to modernize a kitchen, but it often leaves you dealing with old holes that don’t line up with new hardware. How you handle those holes can make the difference between a clean upgrade and a visibly patched cabinet.

The right solution depends on the cabinet material, finish, and how much you want the old hardware to show, if at all.

Common Solutions for Dealing with Old Holes

There are several effective ways to address existing holes, each with its own advantages.

  • Wood filler and touch-up paint: This is the most seamless option for painted or stained wood cabinets. Fill the old hole completely, smooth it flush, and allow it to cure fully before sanding and repainting or staining. Once finished properly, the repair is nearly invisible.

  • Decorative backplates: Backplates sit behind the handle and cover old holes without the need for filling or repainting. They’re especially useful for vintage or decorative kitchens and for homeowners who want a reversible solution.

  • Reusing one existing hole if spacing allows: In some cases, one of the old knob holes can align with one end of the new handle. This reduces drilling and patching, but only works if the alignment looks intentional and symmetrical.

Best Practices When Filling Old Holes

If you choose to fill and redrill:

  • Use a filler appropriate for your cabinet material

  • Slightly overfill to allow for sanding

  • Sand smooth once fully cured

  • Prime if necessary before repainting

Never rush this step. Drilling into filler that hasn’t fully cured can cause cracking or weak screw hold.

Drilling New Holes After Patching

Once repairs are complete:

  • Re-measure handle placement from scratch

  • Use painter’s tape to protect the surface

  • Drill slowly to avoid damaging the repaired area

Taking the time to reset your measurements ensures the new handles look intentional rather than adapted.

Common Installation Mistakes to Watch For

Even careful DIYers make these errors:

  • Mixing placement styles

  • Forgetting to measure from the same reference point

  • Overtightening screws

  • Drilling before confirming alignment

Slowing down is the easiest fix.

Final Alignment Check Before You Finish

Before calling it done:

  • Open and close every door and drawer

  • Check alignment across cabinet rows

  • Tighten loose screws

  • Clean off pencil marks and tape

This final walkthrough ensures everything feels as good as it looks.

When to Consider Hiring a Professional

DIY installation is absolutely doable, but a professional may make sense if:

  • Cabinets are custom or very expensive

  • You’re working with stone or metal fronts

  • The kitchen layout is complex

  • Perfection is critical

Sometimes paying for peace of mind is worth it.

Closing Thoughts

Learning how to install kitchen cabinet handles on drawers, doors, and different cabinet types is less about drilling holes and more about planning, measuring, and consistency. When you approach the project methodically, the result looks polished and intentional rather than improvised.

Take your time, trust your measurements, and don’t be afraid to practice on scrap material. The confidence you gain on the first few handles makes the rest of the kitchen fly by, and the finished result is something you’ll appreciate every single day.

Categories
DIY Projects

Balancing DIY Projects With Professional Help

There’s a certain satisfaction that comes from standing back and admiring something you built with your own hands. Whether it’s a freshly painted room, a new deck railing, or a reimagined laundry space, DIY projects can feel empowering. They promise savings, creativity, and control.

But there’s another side to home improvement that doesn’t always show up in social media tutorials: hidden structural issues, code requirements, long-term performance, and the risk of expensive mistakes. The truth is that most successful renovations aren’t purely DIY or purely contractor-driven. They’re a thoughtful mix of both.

Balancing hands-on work with professional expertise isn’t about ego or fear—it’s about strategy. When you understand where your skills shine and where expert help protects your home, you make better decisions that safeguard your investment and reduce stress.

What follows is a practical guide to finding that balance.

Start With a Realistic Skill and Risk Assessment

Start With a Realistic Skill and Risk Assessment

Before you buy materials or watch a single tutorial, pause and evaluate your actual experience level. Not your optimism. Not your weekend ambition. Your true skill set.

Ask yourself:

  • Have I successfully completed similar projects before?
  • Do I understand the building codes that may apply?
  • Am I comfortable troubleshooting unexpected complications?
  • What happens if I make a mistake?

There’s a huge difference between installing shelving and handling mechanical or structural systems. For example, maintaining your heating and cooling equipment might seem manageable after watching a few online videos, but full-scale HVAC Service often involves refrigerant handling, electrical components, and airflow calibration. Mistakes can reduce efficiency, raise utility bills, or even create safety hazards.

Similarly, tackling a residential roof replacement might appear straightforward when viewed from a ladder. In reality, roofing involves underlayment installation, ventilation balancing, flashing details, and weight distribution. A minor error can lead to slow leaks that go unnoticed for months—until drywall begins to stain or insulation saturates.

The key is understanding risk tiers:

  • Cosmetic changes (paint, trim, hardware) typically carry low risk.
  • Moderate complexity projects (flooring, cabinet installation) require precision but are manageable with preparation.
  • High-risk systems (electrical panels, structural framing, roofing, mechanical systems) demand deeper expertise.

If the worst-case scenario of a project involves injury, code violations, or thousands in water damage, that’s your cue to involve a professional. Confidence is valuable. Overconfidence is expensive.

Define Your Renovation Goals Before Picking Up a Tool

One of the biggest mistakes homeowners make is starting with tasks instead of goals.

You might say, ”I want to redo the bathroom.” But why?

Is it outdated? Inefficient? Hurting resale value? Lacking storage?

Without clarity, DIY projects tend to expand midstream. You replace a vanity, then notice poor lighting. Then you decide the layout doesn’t work. Suddenly, you’re dealing with plumbing moves and structural questions that should have been addressed from the start.

Professionals often begin with a vision conversation. A custom home builder, for instance, doesn’t start framing walls before understanding how you live in a space. They consider traffic flow, long-term maintenance, and energy performance before construction begins.

The same principle applies to smaller renovations. Even when you plan to do some of the labor yourself, consulting a bathroom remodeling contractor for layout advice can prevent costly missteps. A one-hour design review may reveal that moving a fixture six inches saves you thousands in plumbing adjustments.

Before you start:

  1. Write a one-sentence purpose for the renovation.
  2. Identify whether the primary goal is comfort, efficiency, aesthetics, or resale.
  3. Decide which parts require professional precision.

Clarity at the beginning reduces rework later—and protects your budget from emotional, impulse-driven changes.

Budgeting Smart: Where DIY Saves Money and Where It Does Not

DIY often starts with a simple calculation: ”If I don’t pay labor, I save money.”

That’s partially true—but incomplete.

True project cost includes:

  • Tools you may never use again
  • Material waste from errors
  • Disposal fees
  • Time off work
  • The cost of correcting mistakes

Imagine demolishing a kitchen and underestimating debris removal. Renting a roll off dumpster rental container suddenly becomes necessary. That’s an added expense many homeowners forget to factor in.

Or consider a plumbing mishap that leads to a slow leak behind drywall. By the time you notice it, mold remediation and a water restoration service may be required. What began as a cost-saving DIY weekend turns into a five-figure repair.

That doesn’t mean DIY isn’t worthwhile. It simply means budgeting must be realistic.

A balanced approach looks like this:

  • DIY demolition and painting.
  • Hire licensed professionals for plumbing tie-ins and electrical connections.
  • Handle finishing details once inspections pass.

This hybrid model reduces labor costs while minimizing risk. When calculating savings, assign a dollar value to your time. If a professional can complete in two days what might take you three weekends, that efficiency has value too.

Separate Cosmetic Updates From Technical Upgrades

Separate Cosmetic Updates From Technical Upgrades

Not all home projects are created equal. A helpful way to decide what to DIY is by separating cosmetic improvements from technical systems.

Cosmetic updates include:

  • Painting walls
  • Replacing cabinet hardware
  • Installing simple shelving
  • Updating light fixtures (when wiring already exists)

These upgrades generally improve aesthetics without altering structural or mechanical systems.

Technical upgrades, on the other hand, involve performance and safety. For example, pool resurfacing isn’t just about appearance. Surface preparation, bonding agents, curing time, and water chemistry all affect longevity. Improper application can lead to cracking or peeling within a few seasons.

The same goes for complex HVAC Service work. Adjusting ductwork or recalibrating airflow without proper tools can increase energy consumption rather than reduce it.

A helpful rule: if a project affects water, electricity, load-bearing structures, or pressurized systems, think carefully before taking full control.

You might handle painting and trim around a project while leaving technical installation to certified professionals. That division keeps you involved without compromising performance.

Plan Outdoor Improvements With Long-Term Durability in Mind

Outdoor projects are particularly tempting for DIYers. Fresh air, visible progress, and seemingly straightforward materials make them attractive weekend goals.

But exterior work lives in a harsher environment than interior projects. Moisture, expansion, UV exposure, and wind all test installation quality.

Take a vinyl fence. While panel systems are marketed as simple to install, improper post depth or spacing can lead to leaning sections after one winter freeze. Soil conditions matter. So does drainage.

Or consider replacing patio doors. These openings must be precisely flashed and sealed. Even a small gap can allow moisture infiltration, which may not become visible until drywall damage appears months later.

Before committing to DIY exterior work, consider:

  • Local climate conditions
  • Soil stability
  • Drainage slopes
  • Manufacturer warranty requirements

You can often split responsibilities: hire professionals to set structural anchors and weatherproofing, then complete cosmetic trim or finishing yourself.

Outdoor projects reward careful planning more than enthusiasm.

Create a Phased Renovation Strategy to Avoid Overwhelm

Large renovations often spiral because homeowners try to tackle everything at once.

A phased strategy reduces stress and financial strain.

Phase 1: Structural Integrity

Address foundational elements first. If your home needs a residential roof replacement, prioritize that before investing in interior upgrades. Protecting the structure prevents future damage. This phase may also include foundation repairs, correcting drainage issues, or reinforcing framing. It’s not the glamorous part of renovation, but it’s the layer that protects everything else. Skipping ahead to cosmetic upgrades while underlying issues remain unresolved often leads to tearing out new work later—an expensive and frustrating setback.

Phase 2: Systems and Layout

If you’re remodeling a bathroom, consult a bathroom remodeling contractor early to ensure plumbing alignment and ventilation are correct. Even if you plan to install tile yourself, proper rough-in work sets the stage for success. This is also the time to evaluate electrical loads, insulation improvements, and airflow. Making layout adjustments on paper is far cheaper than relocating pipes or wiring after walls are closed. A clear systems plan ensures your DIY contributions enhance, rather than compromise, performance.

Phase 3: Finishes

Paint, hardware, décor, and trim come last. These are ideal DIY tasks once inspections pass and systems function properly. Because finishes are visible and tactile, many homeowners rush toward them—but patience here pays off.

Spacing projects over time also improves decision-making. Living with a layout for a few weeks can reveal adjustments you hadn’t considered. You may discover that a doorway swing feels awkward or that storage placement needs refinement.

Phased renovations protect cash flow, reduce overwhelm, and create natural checkpoints for professional input. They also give you breathing room—time to evaluate progress, reassess priorities, and maintain momentum without burnout.

Use Professionals as Consultants, Not Just Contractors

Use Professionals as Consultants, Not Just Contractors

Hiring a professional doesn’t always mean handing over full control.

Sometimes, the smartest investment is consultation.

For example, meeting with a custom home builder for an hour-long planning session can clarify structural possibilities before you knock down walls. Their experience helps you anticipate hidden framing or load-bearing concerns.

Even something as simple as visiting a benjmain moore store for expert paint guidance can dramatically improve results. Staff can recommend finishes based on lighting conditions, traffic levels, and surface type—insights that go beyond color choice.

Consider hiring professionals for:

  • Design validation
  • Permit guidance
  • Structural review
  • Final inspections before closing walls

Think of them as advisors rather than replacements for your effort. Strategic consultation protects your vision while preserving hands-on involvement.

Know the Red Flags That Signal Stop and Call a Pro

Sometimes the decision is clear. Other times, warning signs appear mid-project.

Red flags include:

  • Persistent moisture smells
  • Visible mold or dark framing
  • Unexpected electrical wiring behind walls
  • Structural sagging
  • Cracks expanding beyond the surface level

If you uncover hidden water damage during demolition, calling a water restoration service immediately can prevent structural rot and indoor air issues.

Similarly, discovering deep cracks in a pool shell during resurfacing preparation may indicate the need for professional pool resurfacing expertise beyond cosmetic patching.

The key is humility. Stopping doesn’t mean failure—it means you value your home’s integrity.

A short delay to consult a professional is almost always cheaper than pushing forward blindly.

Protect Your Investment With Documentation and Warranties

Home improvement isn’t just about appearance—it’s about long-term value.

Keep detailed records of:

  • Receipts
  • Manufacturer warranties
  • Permit approvals
  • Contractor invoices
  • Before-and-after photos

If you install patio doors, retain documentation showing proper flashing and model information. Future buyers appreciate proof of quality work.

Likewise, when adding a vinyl fence, documenting post depth and material specifications supports durability claims during resale.

Professional invoices carry weight with appraisers and buyers. Even if you complete much of the work yourself, consider hiring licensed professionals for critical components that require certification.

Documentation transforms your effort into measurable equity.

Build a Trusted Team Before You Need One

Build a Trusted Team Before You Need One

Emergencies rarely arrive at convenient times.

The middle of a summer heat wave is not the moment to begin researching HVAC Service providers. Nor is the aftermath of a demolition mishap the best time to scramble for a roll off dumpster rental.

Build your network early.

Ask neighbors for recommendations. Read reviews. Verify licenses and insurance. Have contact information saved before problems arise.

It also helps to request estimates in advance for common repairs so you understand typical pricing and response times. When expectations are clear, you can act quickly without second-guessing your choices or overpaying under pressure.

Consider keeping:

  • A short list of preferred contractors
  • Notes on past service experiences

A trusted team reduces panic decisions and rushed hiring. It also fosters long-term relationships, which often lead to better scheduling flexibility and pricing.

Even if you prefer to DIY most projects, knowing who to call creates peace of mind.

Finding Balance Means Protecting Your Home and Your Confidence

DIY projects can be empowering, creative, and cost-effective. Professional help can be precise, protective, and efficient. The most successful homeowners understand that these two approaches are not opposites—they are partners.

When you assess risk honestly, define goals clearly, budget realistically, and remain open to expert input, you create a renovation strategy that strengthens both your home and your confidence.

Balance is not about doing less yourself. It is about choosing wisely where your effort delivers the greatest value—and where expertise ensures your home performs safely and efficiently for years to come.

Categories
Home

3 Warning Signs Your Windows Need Replaced

Knowing when to replace your home windows is crucial for maintaining energy efficiency, comfort, and curb appeal. While some signs are obvious, others may be more subtle and require careful attention. Let’s explore the key warning signs that indicate your windows may need replacing.

1. Drafts Or Unwanted Air

One of the most common indicators that your windows need to be replaced is the presence of drafts. If you feel a breeze coming from your windows even when they’re closed, it’s a clear sign of inefficiency.


Video Source

Over time, seals around windows can degrade, allowing air to pass through and impacting your home’s insulation. It can lead to increased heating and cooling costs, as your HVAC system works harder to maintain a consistent indoor temperature. A local window replacement service can assess the condition of your windows and provide a solution.

Drafts not only affect your wallet; they can also impact indoor comfort. When cold air enters during the winter, your home may feel chilly and less inviting. Conversely, in summer, warm air can seep in, making it difficult for air conditioning to effectively cool your space. This issue often results in uneven temperatures throughout your home, exacerbating discomfort for you and your family. Searching for a local window replacement service nearby can help address these inefficiencies promptly.

Furthermore, consistent drafts can contribute to moisture accumulation around window frames. Moisture can lead to problems like mold growth and wood rot, potentially affecting the structural integrity of your home. Mold is particularly dangerous, posing health risks to inhabitants, including allergies and respiratory issues. Replacing windows not only stops drafts but also protects your home against moisture-related damage. A reliable local window replacement service can advise on the best energy-efficient options available.

2. Visible Wear and Tear

Another indicator that it may be time for window replacement is visible wear and tear. Over the years, windows are exposed to various elements and can sustain considerable damage. Cracks, warping, and peeling paint are clear signs that your windows have seen better days. While some surface-level issues can be addressed temporarily, these signs indicate it might be more cost-effective to replace rather than repair. Consulting with a local window replacement service can provide insights into modern, durable window solutions.

Material degradation, such as rotting wood or rusted metal, further emphasizes the need for replacement. Aging frames and sashes can distort the overall fit and function of your windows, making them difficult to open or close properly. This, in turn, can pose as a security risk, since compromised windows can be easier to breach. Investing in new, high-quality windows improves both the safety of your home and its aesthetic appeal. A local window replacement service can offer a range of secure and aesthetically pleasing options.

In addition to the windows’ aesthetic downfall, operational issues are also a major concern. Windows that are difficult to operate not only diminish your home’s functionality but can also indicate misalignment and faulty components. Sliding windows, for instance, might stick or refuse to slide smoothly, while crank windows might require excessive force. Modern window designs focus on ease of use, and replacing worn-out windows will promote accessibility and convenience. Reach out to a local window replacement service to explore your options.

3. Condensation Buildup

3. Condensation Buildup

Condensation buildup is another warning sign that your windows may need replacement. If you frequently notice fog or moisture between panes, it indicates the seal has failed. This usually happens with double or triple-pane windows, which are designed to trap air or gas for better insulation. A broken seal compromises this insulation, allowing moisture to seep in and obscuring your view. If you encounter this issue regularly, contacting a local window replacement service should be a priority.

Excessive condensation is not just a nuisance; it can be damaging over time. Persistent moisture can lead to issues like wood rot in the window frames, which compromises their stability and functionality. Moreover, it can further contribute to mold and mildew growth, affecting indoor air quality and health. To mitigate these risks, consider investing in new windows that are engineered with advanced sealing technologies. A local window replacement service can recommend products designed to prevent condensation.

In some cases, temporary fixes like resealing or using a window film might be suggested, but these are rarely effective investments in the long run. Such measures are often short-lived and can’t replicate the efficiency lost by aged or damaged windows. It’s essential to understand that window technology has evolved, offering superior performance and lifespan with replacements. Turning to a local window replacement service ensures you gain access to the latest, most efficient window systems available.

Keeping an eye out for these warning signs can save you from increased utility bills and potential structural damage. Investing in timely window replacement not only enhances the comfort and appearance of your home but also its market value. A trusted local window replacement service will ensure that your home is equipped with the best solutions for long-term efficiency and peace of mind.

Copyright © All Rights Reserved | Home Remodeling & Renovation Newsletter | Sitemap